advertisement
Tips for Teaching Cursive Writing is a post from contributing writer Melissa Corkum.
When my oldest started Kindergarten at a local, classical, Christian school, I was surprised to learn that they taught cursive first.
To their credit, they did a great job educating us, parents, as to the “why” of how they taught. They made me a believer. I’ll share a few of these reasons before I move onto tips for teaching cursive writing.
advertisement
Reasons to Teach Cursive Writing First
1. Cursive is often easier for young children to learn because of the flow of the letters and words. Plus, because of that flow, they don’t tend to have as much difficulty with letter and word spacing.
2. Cursive writing requires fewer types of strokes for making letters. Not only does traditional printing require more types of pencil strokes, but it also requires making perfect circles, which can be difficult for young children.
3. Beginning with printing means that students have to learn an entire system for writing only to turn around a few years later and be told that they need to learn another new system for writing.
These are just a few of the reasons that starting with cursive writing is a great option for kids. You can go here to read many more reason to start with cursive first.
Tips for Teaching Cursive Writing
My youngest, who has minor special needs including dyspraxia, has been homeschooled from the beginning. I was surprised (and a little sad) that there weren’t more resources for teaching early cursive.

Here are some tips for teaching cursive writing that worked for our family:
Teach cursive writing by stroke.
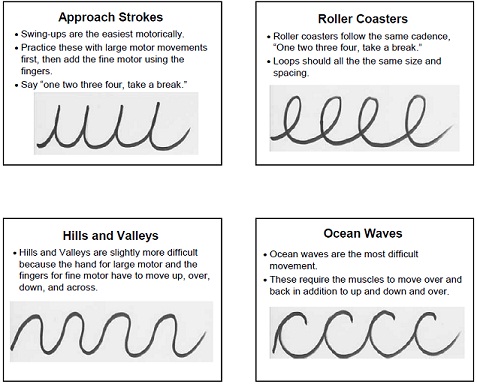
I remember being amazed that all of the lowercase cursive letters could be made from four basic strokes.
I teach the approach (or swing ups) first. Roller coasters (or loops), hills and valleys, and ocean waves follow respectively.
Begin teaching cursive writing by incorporating just the basic strokes in drawing, art projects, and play.
Learn More: Form Drawing for Better Handwriting
Begin teaching cursive writing by starting big.
Whether it’s sidewalk chalk, a sand box, or a mounted chalk or white board, the bigger the better. Gross motor skills develop first and cursive is mostly a gross motor skill anyway.
Once the strokes and letters are mastered on a large scale, they will transfer easily to smaller applications.
From large sensory mediums, I move to one letter per page. Kindergartners love seeing how many times they can trace one letter with a different color every time.
Lastly, we graduate to more traditional handwriting practice. My favorite place to create practice sheets is HandwritingWorksheets.com.
Take your time teaching cursive writing.
Because I teach cursive starting in kindergarten, I incorporate writing the letter with the phonemic sound. We learn one letter a week. Learning a letter includes all of its sounds and how to write it.
That gives the student a week to really drill that letter before moving on to the next one. Older children learning cursive may move at an accelerated pace.
Engage the senses while you teach cursive writing.
It is important that there is some type of response felt as your pencil or finger makes the letters. Mostly it comes in the form of vibration as the writing implement travels over the writing surface.
Chalk on sidewalks, fingers through sand (like in this cool, small tabletop sandbox), and crayons on paper all provide sensory input during writing. If you use a whiteboard, stay away from markers and try grease pencils or whiteboard crayons. Using a vertical writing surface such as a mounted chalkboard or whiteboard also provides additional sensory input as your arm works against gravity.

![]()
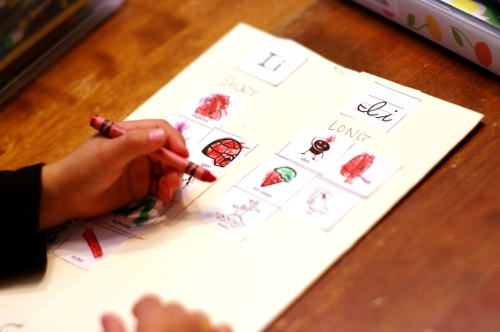
Additionally, try adding audio cues. For example, when I teach the letter “I,” we say its short sound as we swing up and the long sound as we trace down and finish.
We also do an activity where the student decorates a page-sized drawing of the letter.
So far all the suggested benefits of cursive have rung true in our house. Teaching proper printing has come quick and easily at around age 8 once a solid cursive foundation is laid. By that time, they already know the shapes, they just need to know the proper way to form them.
What benefits of cursive have you seen in your family? What is your best tip?
Other Posts You May Love:
- Form Drawing for Better Handwriting
- Sign of the Cross Prayer Copywork Printables
- The Ultimate List of Inexpensive Art Projects
This post contains affiliate links. They don’t change the price you pay. However, when you shop through them, we may receive a small compensation.
This post was originally published on October 27, 2013. It was most recently updated in April 2017.
Join 40,000+ Other Awesome People
Subscribe to the Real Life at Home weekly newsletter to get our latest content, exclusive free printables, learning activities, and ideas for celebrating with your kids all year
I taught all three of my children printing before cursive. It worked well for my first child but my other two seem to have dysgraphia and writing took every ounce of their energy and mine. Then someone suggested I try Logic of English Cursive and it uses a lot of the techniques you suggested above. The great thing about it is that all the lowercase letters start at the same spot, so my son who does a lot of reversals in printing, doesn’t have that issue when writing cursive.
My youngest just finished learning all the lowercase letters and thankfully handwriting is not such a chore anymore.
Welcome to the cursive bandwagon, Paula!
I’m a homeschool mom, and we just started cursive with my 8 year old. I probably should have researched it a bit more before starting it. But I can tell that she’s more focused, her brain is more engaged, and her other handwriting is actually a little bit neater. And I haven’t noticed any reversals, but I will be watching for them.
please give some tips or strokes technique on upper case letter too. TIA
I am a Librarian in Ohio and teach a cursive writing class for 3 weeks 1 hour a week. I have them do what I call cursive art which is what you have at the top of the page. We practice on a white board and we do fun cursive art in a zip lock bag with shaving cream in it. Is there any thing else I should practice with before moving on to the letters themselves.
That sounds like such a great class! When you move to letters, start large and then move to small (like small enough to fit on lined paper). Best wishes 🙂
Great Tips for beginners or those who struggle!!! Teaching cursive writing can be easy if we make it fun for our kids. I always encourage my kids that writing in cursive is as easy as connecting the letters together and the rest is style.
If you go to sign up for the work sheet maker be very careful because at “check out” there is a checkbox already automatically checked for downloading games. it is for a weeks $1.95 trial and then starts charging your charge card for much more!