advertisement
This school year, we decided that each of the kids should take some type of lessons. It was an easy decision, because each of them had been expressing a desire to try something that involved lessons. Jack wanted to try violin, Molly wanted ballet, and Noah wanted to try the piano.
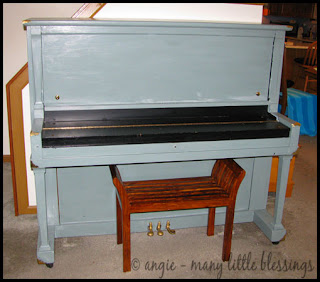
Not having so much as a keyboard, we had to seek out something to have here at home. I wrote before about our divine intervention that brought a piano that needed some real work into our home.
And here is that piano…
advertisement

The funny thing was, we assumed the piano was originally black. We later found out that this wasn’t the case. Regardless, we had decided that the “easiest” makeover was probably going to be to return the piano to black.
Upon working to strip the paint (with a heavy duty sander), Eric found that the piano, indeed, had not originally been black. It was first a light wood with a veneer of some kind. We found a picture online of what it probably looked like when it was first made (at least 60 years ago, based on what we found, but possibly 100 years ago).
Then, at some point, someone (who Eric said he wanted to have a serious talking to with) painted it yellow! Yes, yellow. Then, onto black. And, finally primer and aqua.

It appeared that we were one of the few people who painted it that took the time to take it all apart. Here it was taken apart and stripped as well as could be done.
Eric also, after taking it all apart, decided that a couple of parts of the piano were just too badly worn. So, he made a new piece for the top of the piano, as well as the foot board thingee. (That’s the technical term, I believe.)

They suggested that we use a special Adhesive Primer, as the wood had gotten pretty smooth from so much sanding to strip it. They tinted it gray for us, to help us on the road to a black piano. We also picked up a high gloss black latex paint, as well as various painting items that we needed.
We used small 2-inch foam rollers (and some foam brushes for very small areas) to cover the piano with the adhesive and then two coats of the high gloss black.
And, finally, Eric put the piano back together (and replaced all of the knobs, top hinges, and long piano hinge), and we brought it back into the house…


Now, of course, we need to let it settle and then get it tuned/serviced. We’re just hoping that after all of this work that it can be tuned well. We already noticed one problem key (sounds kind of flat), but otherwise, it seems to sound pretty good.
By the time all was said and done, we probably spent around $250 on our “free” piano. This included: renting a U-Haul to get it home, a $20 Pizza Hut gift card as a gift to the family that gave it to us, good quality primer and paint, painting supplies, four foot piano hinge, various pieces of hardware (hinges, knobs), wood to make the two new pieces of the piano.
But, when you consider that we were going to rent a piano for $30/month, in less than a year, we’ll come out ahead. So, while it didn’t feel cheap to do, it was a frugal option over renting.
After all this, I’m just hoping that Noah really enjoys piano lessons. If not, it looks like Molly will start taking lessons later, whether she likes it or not. (No, really — she has already asked. The piano teacher says she needs to be old enough to read first though.)
This is one task that I’m definitely glad to have done (and Eric is too!). But, there is also definitely a sense of pride as we walk by the piano at a job well done.
This post is linked to Tackle It Tuesday and Frugal Fridays.
Join 40,000+ Other Awesome People
Subscribe to the Real Life at Home weekly newsletter to get our latest content, exclusive free printables, learning activities, and ideas for celebrating with your kids all year


This is an inspiration post to me! I am picking up my “free” piano tomorrow night and hope to make it as lovely as yours. Can you explain how you actually took it apart? Do you mean that you took off the actual panels, etc and then put them back on? How did you put the back on, nails?
Also – just curious how it sounded when you had it tuned and how it’s held up to the wear and tear of kids learning piano?
I am so excited, but a little nervous!
Thanks!
Elizabeth
Elizabeth —
Yes, you’re right – in taking it apart, I mean that my husband took off all of the various panels and whatnot. That sixth picture shows is as far taken apart as he took it apart. He did not take off the back. (He ended up rebuilding two of the panels — the one near the feet and the top cover.)
It actually sounded good after we were all done, and even better when it was tuned. We’ve been having it tuned once a year (standard for a piano), and so far, so good.
In retrospect, as soon as we were finished with all the hard work, we realized that we should have had the piano tuner come out first just to check it. It would have really stunk to have done all of the work and found out that there was something seriously wrong with it. (I knew someone who did work on a piano only to find out that it was unsafe to keep.)
Best of luck to you!
You did a beautiful job refinishing this piano! What a gem in the rough. Great job!