advertisement
How to Make A Self-Watering Planter for under $10 is a post by Jennifer of Adventures in McQuill-land.
My husband and I have joked that we are raising two little farm boys in a town home in Northern Virginia, not an easy task, believe me. Our youngest once devised a plan for keeping a goat in a pen outside our living room window. He didn’t think the neighbors would mind too much as long as his goat trimmed their grass each week.
=”1″]
Our older son dreams of having an apple orchard. Of course, when you live on 0.05 acres, the number of trees you can plant is limited to about zero!
But our boys are not easily deterred. Connor is still trying to figure out where he could hide a goat, and maybe a few chickens, and Ryan is still planning his orchard, as well as a fruit and vegetable garden that would easily feed a family of 10, or perhaps a neighborhood of 200.
advertisement
To encourage the boys’ desire to plant, and grow, and harvest, even if I couldn’t do much about supporting their dream of goats and chickens, I started looking into gardening and homesteading on a small piece of property.
I found a number of books outlining ways to homestead on as little as a quarter of an acre, but not much detailing how to do the same on one-twentieth of an acre!
Then I started reading about container gardening. It turns out you can grow just about anything in a container, and you can fit a lot of containers in a very small space. The only problem is, the best containers are self-watering containers, and they’re expensive – unless you make your own, which is what we decided to do.
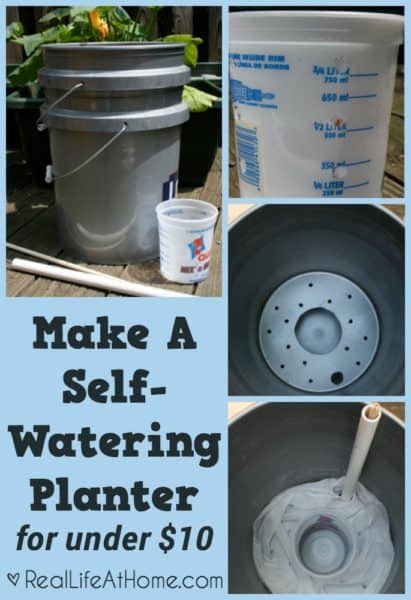
How to Make A Self-Watering Planter for under $10
=”2″]
Materials Needed for the Self-Watering Planter:
- two five-gallon paint buckets
- a 1-quart paint mixing container
- a piece of 1/2″ PVC pipe
- a dowel
- a drill
With these materials, we made simple, sturdy self-watering planters that can hold everything from tomatoes or green peppers to squash or zucchini or maybe even a columnar apple tree!
Want to make your own self-watering planter? It’s easy. It really is!
Directions for Making Your Self-Watering Planter:
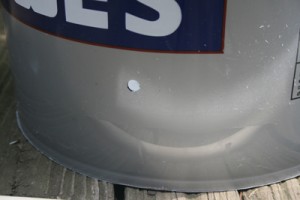
To start, place one five-gallon paint bucket inside the other. Drill a small hole in the bottom bucket just below the base of the top bucket. This is your overflow port, which will keep your self-watering planter from becoming water-logged after a heavy rain.
Next, drill four small holes from top to bottom along one side of the paint-mixing container. Repeat three more times around the container. This will act as your wicking-agent to draw water from the bottom container up into the soil in the top container.
Now, cut a hole in the middle of the bottom of the top bucket just large enough to place your paint-mixing/wicking container into. You’ll want the container to be about half above and half below the base of that bucket.
Next, drill a number of holes in the bottom of the inside or top bucket to allow excess water to drain out of the soil and into the water reservoir, and one slightly larger hole to hold your cut PVC pipe in place.
=”3″]
Don’t worry, you’re almost finished. Cut your PVC pipe and your dowel just long enough to reach from the base of the bottom bucket to the top of the top bucket. The PVC pipe is going to allow you to fill your self-watering planter when there is no rain in the forecast.
The dowel will float and raise up when the water is sufficient, and fall inside the PVC pipe when it isn’t, so there’s no guessing about when your plants need water.
You’ll want to place a layer of cheese cloth or coffee filters over these holes before filling your planter with soil to keep the soil from washing through the holes into the water reservoir.
That’s it! You have built a self-watering planter for under $10.
If you’d like, have the kids paint the buckets with acrylic paints (on the outside only) before filling them with soil. Once they’re dry, put the pieces together, fill the top bucket with soil, plant your seeds for the veggie or fruit of choice, water the soil thoroughly to get the wicking-action going, and sit back and wait to harvest your homegrown produce.
How do you encourage your children’s hobbies when space is limited? Have you found creative ways to garden in extremely small spaces?
Other Posts You May Love:
Jennifer and the boys are busy building planters and planting a selection of summer vegetables, including corn which they are going to try growing in a cardboard-lined wash basket, but that’s a story for another post. When not digging in the dirt or harvesting fresh veggies, Jennifer can be found blogging at Adventures in McQuill-land.
This post contains affiliate links. They don’t change how much you pay. When you shop through them, however, we may receive a small compensation.
Post originally published June 29, 2011. Most recently updated May 2017.
Join 40,000+ Other Awesome People
Subscribe to the Real Life at Home weekly newsletter to get our latest content, exclusive free printables, learning activities, and ideas for celebrating with your kids all year




Hello! Great idea and I tried it this weekend. But when I put the dowels in the pvc tubes, they didn’t rise with the water. Did I miss something?
I saw on another site that they cut foam circle for the end of the dowel so they would float
Thanks for the step-by-step instructions! We have to move our garden this summer and didn’t think we’d be able to plant anything this year, but we made four of these today in about an hour for our tomato plants. So excited that we’ll have at least a few plants this year! Thanks again!
Planting a veggie garden for a small neighborhood of fixed income seniors. Need it to be very low maintenance and economical, while producing bumper crops. Did this method work well for your family? Have you tried something else that you would recommend? Thanks for any learned lessons you can share.
Would be great if you had a simple diagram to follow.
Great guide!
Question about lining with cheesecloth/coffee-filters – do you also line the inside of the 1 quart container?