advertisement
When our children are younger, and we usually accompany them when they go out, having identification is generally not an issue.
With a middle school age child though, there are times when my daughter does things on her own with another family or a friend and needs to prove she is the age she says she is. Some business also give discounts to students when they show their “school” ID card, or for the older set, they may need it for extracurricular activities, especially if those take place at a public school.
If for no other reason, they are handy for parents to keep in their wallets, for purposes we hope we never have to use them.
Here are some things you will need to make your own homeschool ID card:
1. A head shot of your child – It’s best to do this against a blank wall. If you are ambitious you could hang a bed sheet up if you want a bit of a pattern on the background. If you already have portraits done that are current, you could scan those into your computer if you have a scanner.
2. Some sort of word processing or photo processing program – ID cards can be as simple or as elaborate as you chose to make them. Nothing more than Microsoft Word is needed, or you can be creative and expressive and use a photo program to make them. The one I will show was done in Photoshop Elements 6.
3. Photopaper – You will want to print the finished product on photo paper. It will last longer, and be more durable. You could laminate it or just used a clear pocket (like for credit cards) to store it in.
The steps themselves are quite simple
1. The card should be 3 x 2.5 inches in size. This is about the size of a business card if the program you are using has a template for a business card, you can use that. Otherwise, simply set the page size to custom, and use those dimensions.
2. Insert the picture of your child in the document. You can chose to crop and size the picture before or after you insert it, whichever you find easier. Just make sure that you have the picture at the very front of the document. This is very important if you are using Microsoft Word, as it will allow you to type where ever you chose on the document. You do this by choosing the “text wrapping” option when you double click on the picture after having inserted it into your document, and then choosing “in front of text”. This will allow you to reposition the photo anywhere you like also.
3. Place your homeschool name on the card. “Jones Academy” or “Ravenhill Homeschool”. If you are part of a homeschool co-op, ask if you can use their name on the card, if you don’t have a name for your homeschool.
4. Decide what type of personal information you would like on the card. Usually school ID cards have the school year, the students name, and the grade they are in on them at the very least. Some have physical attributes (hair/eye color, height), and others have birth dates and addresses. Depending on what you are using it for, you may not need a lot of information. If you want one for emergency purposes, you would likely want a lot of physical information on it.
When you are satisfied that the card is the way you would like it, print it off and admire it!
This would be a great activity for upper elementary to high school students to do themselves as part of an art or word processing/photo processing course.
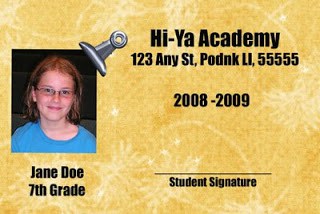
Here is an example of what a homeschool ID card could look like:
advertisement
(this was done in Photoshop Elements 6).
Do you have homeschool ID cards for your children? If so, what kind of information do you have on them? If not, did this post inspire you to make some?
This post was originally published on the site on September 25, 2008.
————————————————————————–
You can stop by Tammy’s blog at Three Different Directions, where she is eagerly counting down the days until her family vacation.
Join 40,000+ Other Awesome People
Subscribe to the Real Life at Home weekly newsletter to get our latest content, exclusive free printables, learning activities, and ideas for celebrating with your kids all year
This is great. This week is crazy but this is on the top of the todo list for next week.
Thank you for putting this together!
Laura
http://thephoenixacademyblog.wordpress.com/
What a great idea! I’ve never thought of doing this, but it definitely makes sense.
Love this! It’s a fabulous idea!!!
I am loving this idea!!! Thanks for sharing!
Also good to have one for Mom (or Dad) to show at places who give educator discounts, i.e. Michael’s, Barnes & Noble, JoAnn Fabrics, etc. Can be made just as easily. 🙂
This is an absolutely brilliant idea! Thank you for sharing it.
This is a great idea and we will actually do this for our co-op. Thank you!