advertisement
The follow is a post from contributing writer Megan Spires from House of the Rising Sons.
advertisement
Are you ever frustrated with the flow of your school day? Do you feel like you spend a lot of wasted time searching for that one thing you need for that science project right now? And while quickly searching through cupboards and drawers, you can hear the kids starting to lose their patience. I’ve been there.
And while looking through those cupboards, you realize you have an awesome puzzle of Australia that would have been perfect for that Unit Study you did last month. Then you spot some math games you had forgotten about that might really help your student with some of those math concepts he’s been struggling with.
By the time you find what you’re looking for, the moment is lost. The kids have scattered and any minute, they’ll most likely be hungry. This would describe many of my days…last year. It feels like you’re just spinning your wheels all day, never gaining any real ground.
I had a loosely put together schedule of what I wanted to accomplish with my boys during our school days, but it was written down in my lesson plan for my eyes only. So the other problem I began to see was that my boys were always frustrated because they couldn’t “see” what their day entailed. They would say, “Mom, what’s next?” and “When are we going to….(you finish the sentence)?” And then one day, my six year old said to me, after I asked him why he was so frustrated, “Well, if I knew what we were doing today, then I would feel better!”
Makes sense. I like to know what’s going on too, don’t you?
This is when I found Sue Patrick’s Workbox System. I loved it. I studied it. I researched all of the ways that many of my favorite homeschool mom bloggers used it and then we put together our own version. Because we have four kids and not a lot of extra space, I needed to create a system that would work for us. My kids are also highly visual learners, so I put together something we call our School Box Planner.
If you’re familiar with the Workbox System, you know each child would have a workbox (or drawer of some kind) for each subject area and activity during the school day. Each box would contain the supplies and work needed for every lesson that day. The child would have a chart of some kind listing each box and outlining the agenda for their school day. It’s really a brilliant concept and so nice for helping you and your kids be more organized.
Here is how our School Box Planner works:
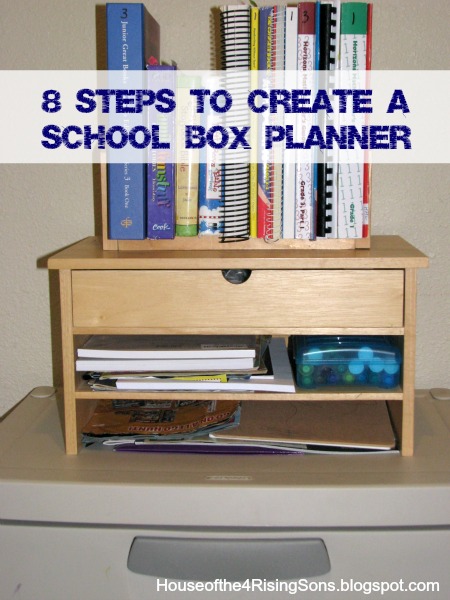
 1. The very first thing we purchased was a sturdy 4-Drawer Sterilite storage cabinet. There are many different options and sizes out there, but we like this one because the drawers are so deep and sturdy. This one can be purchased at most retail stores like Target and Walmart.
2. Next, I wanted to find a way for my readers and non-readers to easily see what their entire school day would look like. It was important for me to leave room for flexibility because often things will come up during our day that make it necessary for us to either switch gears or skip a school subject and come back to it later in the day. After trying many methods, I settled on one that is working beautifully for us. I bought a small dry erase board for each each child and a roll of Velcro dots. You could easily use strips of Velcro and cut them into smaller pieces.
3. Then, I arranged the dots on the board evenly in two rows of four. You could do less or more, depending on how many subjects, activities or lessons you have planned in a day.
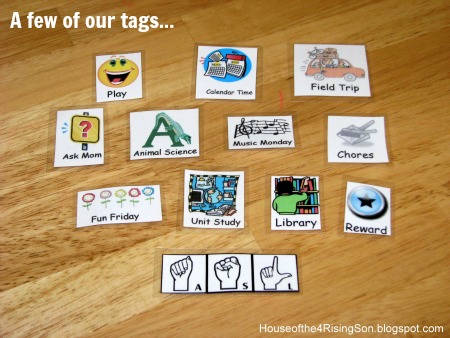
4. This next step will be the most time consuming part, but so worth it once you’re done. I wrote down a list of all the things we might do in a day which included any trips out of the house to the library, the store, parks etc. Along with every school subject and activity, I also included all games, puzzles and project ideas. This step helped me to inventory all of our supplies and really get an idea of the things I always intend to use for school, but forget we even have.
5. With list in hand, I then created a PDF document of all our daily activities by making small tags along with words to velcro on to our dry erase boards (about 100 in all x 4 for each child). You could create these tags using any publishing software you have. I even used Word for my first set of tags.
6. Then I laminated these tags so they will last. If you don’t have a laminating machine, clear contact paper works well too. Our School Box Tags are also available for free if you’d like to use ours to print for yourself.
7. Each night before bed, I then look at my lesson plan, along with that handy list of supplies we have and outline the kids’ School Box Planners accordingly. For instance, for Math, I will find the Math tag and velcro it to the board. And then, since I can write on it, I will write the page numbers that need to be completed. If we are doing an art project, I’ll include the Art tag and one detail about the project for clarification.
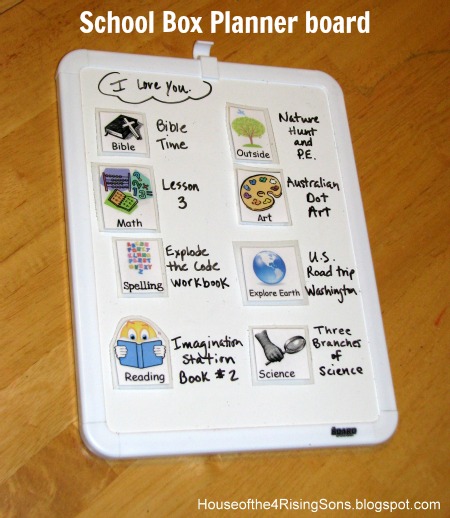
8. Then, I make sure each drawer is filled with everything they need for the following day, including fun things for our 2 year old to do. Because there are also written details on their boards, my kids are able to easily identify what items they’ll use for each subject. Once each item is completed, they check off their work and see what’s next.
Megan writes about her amazing journey raising and homeschooling four active boys while sharing her faith at House of the Rising Sons.
This post contains affiliate links. They don’t change the price you pay, but they help support this site. Thanks!
Join 40,000+ Other Awesome People
Subscribe to the Real Life at Home weekly newsletter to get our latest content, exclusive free printables, learning activities, and ideas for celebrating with your kids all year
Leave a Reply