advertisement
Written by contributor Julianna of Petunia June.
This winter my six-year-old daughter and I thoroughly enjoyed reading Winnie the Pooh together. As we vicariously traversed the Hundred Acre Wood with Pooh, Piglet, and the gang, it occurred to me that the scenes and events in the story would make an excellent board game.
advertisement
We worked on our board game for about four days, but it could be simplified (or made even more complex) depending on your child’s interests and age. Once you’ve chosen a story and a general game design (we patterned ours after Candy Land), follow these guidelines for creating your own:
1. List the characters. As you read the book with your child, draw his or her attention to the characters that enter the story. (These will later make up your game pieces.) Take this opportunity to discuss the main character and why you think he or she is important to the story.
I read with a clipboard nearby and frequently said, “Oh! Here’s someone new in our story. Who do you think it is?” As my child listed the characters, I jotted down their names.
 2. Take note of the setting. The characters need somewhere to go in your game. While reading, notice the places the characters visit (the setting). After finishing a passage or chapter, ask your child to point out where the characters went. Keep a list of these locations.
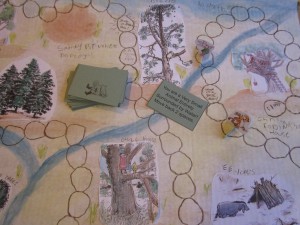
In our story, we included places such as “The Bee Tree” and “The Sandy Place Where Roo Plays.” We determined that the object of our game would be for the characters to travel from Pooh’s house to Christopher Robin’s Tree House.
3. Key in on the plot. Plot refers to the events that make up a story. As you read, jot down specific action phrases and events. These will later form the action cards for your game. I frequently copied directly from the text, which will serve to keep my child’s mind focused on Milne’s excellent writing.
For example, Piglet’s experience during the rainstorm eventually became a card that reads, “You are a Very Small Animal Entirely Surrounded by Water. Move back two spaces.”
 4. Discuss the rules and object of the game. Your child will love being in charge of the rules! Determine what you want your characters to do and how they will do it. For us, this meant designing a simple winding path that leads the players from Pooh’s house (start) to Christopher Robin’s house (finish). Action cards are drawn from the center pile which tell the character how many spaces forward or backward they must go.
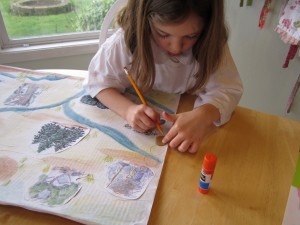
5. Create your board. We used a piece of cardboard covered with white paper as our base. The locations on the board were taken from the “setting” list we created. We printed simple black and white pictures that represented each location so that my daughter could brighten them up with watercolors. After painting, they were spaced across the board, glued, and left to dry.
5. Add spaces for the characters to move across and embellish as desired. My daughter traced a stone-shaped piece of cardboard to serve as spaces. She wove the trail through the “woods,” making sure to pass each location along the way. She also labeled each location and embellished the board with watercolors and colored pencils (and a bit of help from Mom).
 6. Make game cards. We referred to our list of events and used these for the action cards. I printed them up on card stock and added a little character graphic on the back to make it look a bit more like a “real” game. Each card moves a character forward or backward.
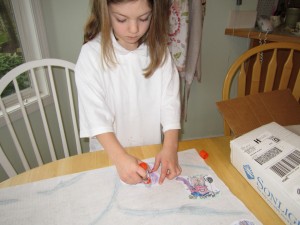
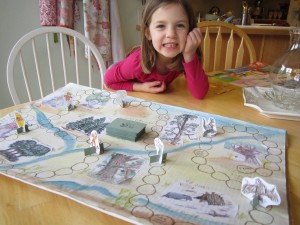
7. Cut out and color game pieces. Again referring to our list, my daughter chose the characters that she’d like to include as game pieces. We printed up 2″ pictures of Pooh, Piglet, Owl, Kanga, Christopher Robin, and Rabbit.
After my daughter colored them, we glued them onto card stock (this step could obviously be simplified if you happen to have white card stock, which we did not) and cut slits in the bottom to create little stands.
8. Play, play, play! Now you get to thoroughly enjoy the fruits of your labor. Grab a character and have fun exploring the Hundred Acre Wood, the Little House on the Prairie, or wherever it is that your child’s imagination takes you.
 Your child will feel a strong sense of accomplishment knowing that she has created her very own game. The story’s characters, setting, and plot will be reinforced throughout the process, and there’s plenty of opportunities for a budding artist to blossom. The author’s words will become a part of your child’s vocabulary, instilling in her mind a taste for excellent writing.
But the best part? You and your child can snuggle and giggle together on a rainy day while sipping hot chocolate and playing your game. Just beware! You might end up becoming “Entirely Surrounded by Water,” which will send you back a space or two. And we all know how anxious that can be.
Join 40,000+ Other Awesome People
Subscribe to the Real Life at Home weekly newsletter to get our latest content, exclusive free printables, learning activities, and ideas for celebrating with your kids all year
I was so happy to find this post! My 3 year old and I have been creating board games lately and, after finding this post, I am incredibly excited to combine her love of books and characters with her love of games. Thank you for sharing all the details of your adorable creation.