advertisement
I took these pictures a few weeks ago, intending to post the recipe and how to make Pine Bark (which I have also heard called Cracker Candy). And, then I just kept putting off posting it.
I really enjoy making these because not only are they tasty, but I love all the different visuals of making this. That’s why I just couldn’t help going a little Pioneer Woman Cooks and take pictures throughout making these yummy and sweet treats.
advertisement
 Cover a cookie sheet (with sides) with foil, and then grease the foil. (I just use some cooking spray.) Set out about a sleeve’s worth of Saltine crackers — salt side up. I can’t really fit a whole sleeve, except for that I break the last few and fit them in on the sides.
 Prepare 1 cup of butter (two sticks), as you will be boiling it. To me, it is always easier when you cut them into pats of butter instead.
 Plop them all into the sauce pan, and start melting them!
 Add in 1 cup of packed brown sugar. (Confession here: I have THREE bags of light brown sugar in my pantry right now! I kept buying it, thinking I was out. Apparently I was not. I now ask Eric to pick me up brown sugar everytime he runs to the store. He tells me that one time when I realy need it, I will ask, and he will think I’m joking, and then I’ll be sorry.)

Starting to look good! Keep stirring frequently while waiting for it to start boiling.
 Especially once it starts to boil, make sure to just keep stirring constantly. You’ll want to let this mixture boil for about three minutes. (You might even be able to get away with two minutes, but I always do three.)
 Once you’re done boiling the mixture, remove it from heat, and add in 1/2 teaspoon of almond extract. When you add the extract, it will start sizzling. (I suspect this has to do with the flash point of almond extract.) Just mix it throughout.
 Pour the mixture over your crackers. The first thing I do when I pour is to try to get it as much over all the crackers as possible. This is what mine looked like at this point.
 Now, go ahead and make sure to spread (using a spoon or the like) over the whole pan of crackers.
As long as your oven has preheated by this point, you will pop this pan into the oven and bake it for about 4 – 6 minutes. (Use your knowledge of your oven to know if you should be on the low or high end of this range.)

While the crackers and mixture are baking, you will be busy breaking up chocolate bars. Now, this is an important note — you need 20 oz of chocolate. The first time I made this, I looked at my Mom’s recipe and saw four chocolate bars. I thought, hey — no problem, and bought a six pack of Hershey’s bars. I then ended up scrambling while I was baking the mixture, because I realized it was four of the five ounce bars (those big ones), not the standard ones.
So, get your four BIG bars and break them into chunks while your crackers are baking. Or, if you have children, you can ask them to work on it instead.
 Oooo…bubbly and cool looking! Your crackers are ready to come out of the oven. But, be careful, as I find it to be kind of liquidy at this point, and so you will carefully carry it to a counter.
 Toss your broken up chocolate onto the hot mixture. Seriously — do it as soon as you set the pan down. Then, just wait about 20 or 30 seconds. Just let them sit.
 Okay, NOW you can try spreading out the chocolate with a spatula. But, I actually just spread it out some, and then step away again for about 20 – 40 seconds. This is how it looked after I first spread it out.
 Once I stepped over to do it again after waiting, it easily spread the rest of the way.
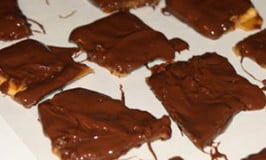
Let this cool for a bit, and then you’re going to break up the cracker candy and lay it on wax paper.
 This has got to be one of the hardest parts of the recipe — letting it sit out to set the chocolate mixture before eating. And, seriously — sometimes we just don’t wait. Sometimes we just have chocolatey fingers after enjoying a piece fresh off the pan.
4 (5-oz) Hershey bars, broken into pieces (remember — 5 oz is the big size)
How to Make Pine Bark (Cracker Candy)
Ingredients
- One sleeve of saltine crackers ends up being about 36 - 38 crackers or so
- 1 cup butter
- 1 cup light brown sugar packed
- 1/2 teaspoon almond extract
- 4 5-oz Hershey bars, broken into pieces (remember -- 5 oz is the big size)
Instructions
- Preheat your oven to 400 degrees at some point while doing the next several steps, based on how long your oven takes to preheat to that temperature.
- Cover a cookie sheet (with sides) with foil, and then grease the foil. (I just use some cooking spray.)
- Set out about a sleeve’s worth of Saltine crackers — salt side up. I can’t really fit a whole sleeve, except for that I break the last few and fit them in on the sides.
- Prepare 1 cup of butter (two sticks), as you will be boiling it. To me, it is always easier when you cut them into pats of butter instead.
- Plop them all into the sauce pan, and start melting them.
- Add in 1 cup of packed brown sugar.
- Once it starts to boil, make sure to just keep stirring constantly. You’ll want to let this mixture boil for about three minutes.
- Once you’re done boiling the mixture, remove it from heat, and add in 1/2 teaspoon of almond extract.
- Pour the mixture over your crackers.
- Now, go ahead and make sure to spread (using a spoon or the like) over the whole pan of crackers.
- As long as your oven has preheated by this point, you will pop this pan into the oven and bake it for about 4 – 6 minutes.
- While the crackers and mixture are baking, you will be busy breaking up chocolate bars.
- Once the time is up, pull your pan out of the oven.
After You Take Your Pan Out of the Oven
- Toss your broken up chocolate onto the hot mixture. Seriously — do it as soon as you set the pan down. Then, just wait about 20 or 30 seconds. Just let them sit.
- Okay, NOW you can try spreading out the chocolate with a spatula. But, I actually just spread it out some, and then step away again for about 20 – 40 seconds and spread again.
- Let this cool for a bit, and then you’re going to break up the cracker candy and lay it on wax paper.
- Allow to cool and chocolate to harden.
- Store in an airtight container.
Join 40,000+ Other Awesome People
Subscribe to the Real Life at Home weekly newsletter to get our latest content, exclusive free printables, learning activities, and ideas for celebrating with your kids all year
i tried this and it was sooooo good!
Oh my, I can’t wait to make these with my daughters. They look so simple yet yummy! Thank you for the detailed instructions. I felt like I was right there in the kitchen with you!
These sound so yummy!
This Christmas we are borrowing another blogger’s suggestion of creating a Family Advent Journal. I’m turning it into a record of the arts & crafts we do each day of the month (which means pictures of our yummy creations). Can’t wait to add the mess to our book 🙂
Can you make it without the almond extract.
You can also make this graham crackers! We make it every Christmas for our “goodie” trays!