advertisement

I have had whoopie pies before from some German Baptist sellers at our local farmers market, as well as at my sister’s house when they lived in Pennsylvania (though they called them Gobs there). They were one of those things that I thought would be fun to make, but never thought much about it beyond that.
A few weeks ago, thanks to the book Whoopie Pies, I was able to make some. I can’t wait for another chance to make them, though I think I have to wait until a time when I can take some of them elsewhere (like a party or perhaps in our Christmas goodie trays).
Chocolate Whoopie Pie
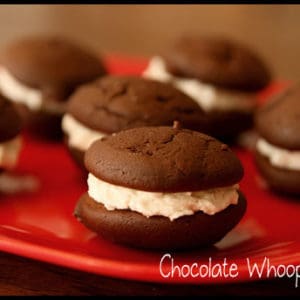
Chocolate Whoopie Pies
Ingredients
- 1 2/3 cups all purpose flour I used half unbleached white/half whole wheat
- 2/3 cup unsweetened cocoa powder
- 1 1/2 teaspoons baking soda
- 1/2 teaspoon salt
- 4 tablespoons butter softened to room temperature
- 4 tablespoons vegetable shortening
- 1 cup brown sugar packed
- 1 egg large
- 1 teaspoon vanilla extract
- 1 cup milk I used skim
Instructions
- Preheat your oven to 375 degrees (and make sure that you have a middle rack clear for putting in your whoopie pies). Prepare a cookie sheet (or two, if you prefer) with parchment paper.
- Combine flour, cocoa powder, baking soda, and salt. Set these aside.
- In a mixing bowl, beat butter, shortening, and brown sugar together on a low speed until they are just combined.
- Adjust power to medium and beat for about 3 minutes, or until fluffy and smooth.
- Add in the eggs and vanilla, then beat for an additional 2 minutes.
- Add in half of the flour mixture, as well as half of the milk, to the butter/sugar mixture. Mix and then scrape the sides of the bowl. Then, add in the other half of the flour and other half of the milk, and combine completely.
- With a spoon or cookie scoop (that's what I used and it made it so easy), drop 1 tablespoon of batter on the parchment paper. Space these out at least two inches.
- Bake the cakes for approximately 10 minutes each, or until the cakes bounce back when you gently press them. Once you take them out, let them sit on the pan for five minutes before moving them onto a cooling rack.
- After the cakes have cooled, you can use a decorating bag (or spoon, if you don't have a bag or other decorating-type item) to add frosting (I used my vanilla frosting recipe) to the flat side of one of the cakes, and then sandwich it with another cake.
Notes
This post was originally published on Many Little Blessings (one of the sites that was merged together to make Real Life at Home) on August 16, 2010.
 |
Angie, a domestically challenged nerd and mom of three very fun kids, is the founder of Real Life at Home. Angie also listens to music every chance she gets, writes eBooks, podcasts, loves Pinterest, documents the little moments in life on Instagram, and occasionally sleeps. |
Join 40,000+ Other Awesome People
Subscribe to the Real Life at Home weekly newsletter to get our latest content, exclusive free printables, learning activities, and ideas for celebrating with your kids all year
I’ve always wanted to make these, they look so delicious!
My kids would love these! 🙂
ok, I’ve got some of these in the oven now, and some cooling. They aren’t going to last long! They’re super light and oh so delicious! My only problem is I don’t have the powdered sugar for the frosting. Oh well… these are awesome plain!
@Karen,
Wow, Karen — you’re such a go-getter! Can’t believe you’re already making them. Funny thing is – I always have powdered sugar (because I never know when I have to make cupcakes for something at the last minute), but it was the shortening that I didn’t have when I made them.
I want to make pumpkin ones in the fall. You know, if anyone ever carries pumpkin in the store again.
Oh, these look so very delicious!
Blessings!
Gail
Have you made these with straight butter instead of shortening? 😀 They look fabulous!
Have a great day!
Sherry
@Sherry,
I would like to try it with just butter (because shortening is icky – LOL), but I read that they wouldn’t be as springy or light with all butter. I suppose it’s worth a try though, huh? Let me know if you make them and try it out with the butter only option.
Oh, these look good. I have bookmarked this to try some time!
Wow, these look great. I also love the photo–putting to work the tips you used from the savvy blogging summit, I see! 😀
@Alicia’s Homemaking,
Going to the photography class made me feel less lazy to go get my external flash and put it on. (Okay, that’s a lie. I suppose I’m still being lazy, it’s just that I am leaving the big ol’ external flash on it.) Actually, I guess it has made me less lazy, because I kept just grabbing my point and shoot to do stuff because it was smaller. Now, I’ve been making a point of actually using my digital SLR again. Yeah for less laziness. 😉
Thanks for the compliment on the picture, by the way. I really like the way that one came out too.
YUM!!! I’ve never made these before, but they look delicious! 🙂
~Lynn
ok, so I decided I just had to finish them yesterday and got the sugar to make the frosting. (heh. they just looked TOO good.) And now, my only question is, how do you store these? I put them in a tupperware container separated by layers of wax paper, but the tops and bottoms are sticking a bit when I take them out.
@Karen,
I don’t really know of any way to get them to not stick at least a little bit. The way you did it is what I do.
This is one of my kids favorite treats!
I learned to make them several years back and they are great!
Lots a work but yummy!
These look so good! You can’t go wrong with cookies and frosting.
Wow, those do look very yummy. I have made the pumpkin ones and they are great! I love how you use “frosting” for the middle. I will have to try that. ~ Take Care…
These look SOOOO good!! I love homemade whoopie pies. Your picture makes me really want one bad now. I’m bookmarking this for when I get inspired to bake a batch!
Just thought I’d drop you a line to suggest that you use a boiled icing for your filling. I have a very easy recipe for what we call Whacky Pies. Same essential treat but uses a cake mix to make the chocolate cookie part, and then the homemade filling. I have to say I have tried whoopie pies in many other places but none are as good as the ones made with the boiled icing. This is more of a filling, than a frosting as it does not harden. It stays exactly as it is when you are done making it.
1 devils food cake mix, 1/2 cup water & 2 eggs. Mix, spoon onto cookie sheets, bake for 10 minutes at 350 until set. Let cool completely before filling or filling will melt.
filling: 1 cup milk and 3 tbsp flour. bring to a boil while whisking or beating to avoid lumps. Let cool. then add: 1/2 c. butter (room temp.), 1 c sugar, 1/2 c. shortening, 1 tsp vanilla. Mix all together with beater, beating vigorously until smooth. Use to fill “cookies”. Enjoy.
Thanks for the suggestion. The homemade vanilla frosting is actually our favorite part. 😉 But, maybe sometime we’ll try out yours too.