advertisement
Yesterday, I posted about going from deciding to straighten up my craft room for our Spring Spruce Up to making a plan for an actual room makeover. I shared with you the planning process that we took, and then also shared what it looked like when we took everything out of the craft room. (In interest of full disclosure, let me just say that when I saw “we took everything out of the craft room,” that actually means, “It was a Saturday morning and I slept in. Eric cleared the entire room himself while I was blissfully unaware.”)
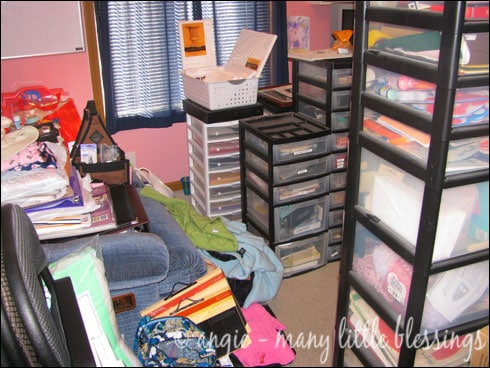
In case you missed what it looked like in the playroom with all of the supplies in there, here it is again:
advertisement
All of my craft supplies in the playroom
Our Plans
I talked about our planning process yesterday. Today, however, let me share with you some of what we actually decided.
1. Instead of searching for another desk that might work better, we would look for a counter top to use instead. (None of the counter tops were the right size, however, as we were looking for something around seven feet long. Most counter tops that were in stock were either six or eight feet. I was surprised that most were under $50 though.) Instead of a counter top, we opted for a shelf that was eight feet long (but Eric would be able to cut down) and 23 inches deep. It cost $15.99. (Much more economical than a new desk!)
We also had to purchase brackets to support this shelf. Because of the nature of what they were holding, we had to go with more expensive brackets. Still, we probably spent only around $20-ish on brackets.
On a funny note: Eric said one set of brackets were “thousand pound brackets” (meaning a set could support a thousand pounds). Molly scrunched up her forehead, walked to the brackets, and then picked one up. She then looked at Eric with some disgust and said, “Dad – these do NOT weigh a thousand pounds.”
2. We decided that all of the shelving would be best on only one long wall, instead of making an L-shape (just like the old desk). Doing this would allow us to change the layout of the room, and it would also save money because we would mostly just use existing shelving in a new spot. (One exception to the shelf idea was the very top shelf. It would now run the entire long wall, as well as a bit on the shorter wall.)
3. We would add one section of shelving to the highest shelf. This was purchased (with brackets) for under $10.
4. We would stack all of the drawers in one area (and really high).
5. I would get a new desk chair. I was determined that this would not cost a fortune, even though I know that the last time I sent Eric to the store for a new desk chair, he brought home one that was either $80 or $130, depending on which of us you ask. (Oddly, he thought he spent more, and I thought less.)
Our Plan in Action
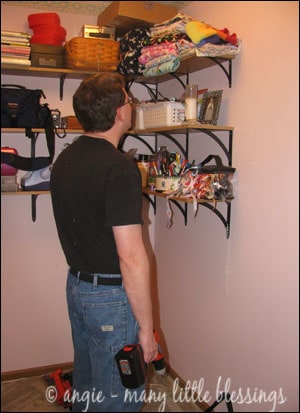
Here, everything was out of the room (except some of the shelf items). This is what the shelves looked like prior to the work beginning. Eric had already worked very hard at this point, clearing out the room and taking apart the L-shaped desk to get it out of the room.
We went to church, dinner, and a trip to the hardware store (for some more screws and such), so we had to leave the project for the next day.
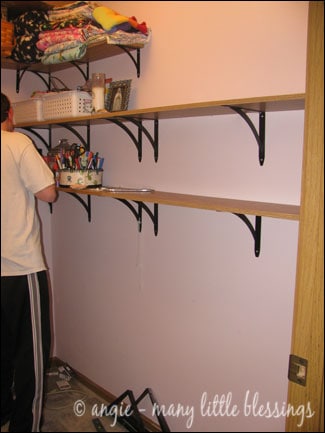
The process of moving shelving from both walls onto just one wall had begun. Although it’s not finished, some of the shelves now reach from one end of a long wall to the other end. Yeah!
My new shelf-turned-desk has been installed. To test it, Eric even sat on it. (I’m glad I wasn’t there right then.) Look at all that amazing space (and at such a great price)!
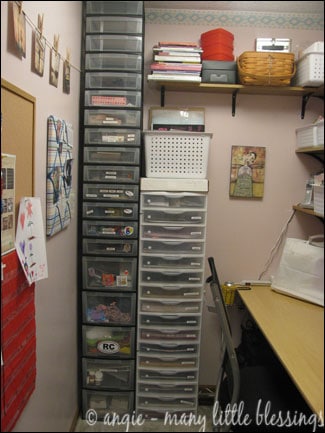
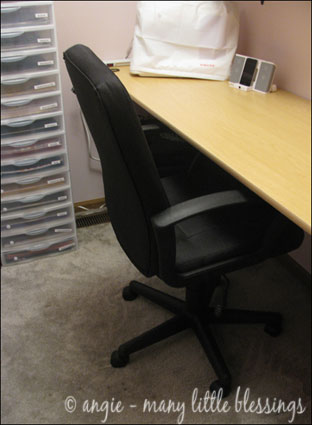
This is actually the desk (or at least part of it) after everything moved back in. (This isn’t the final chair, however. It’s my computer desk chair.)
I looked through everything as I brought things back into the craft room. I took a box of things to Goodwill, gave one of my sisters some things (like the desk and seven of the black drawers), and then also made a small pile of things to sell.
We were able to consolidate into just one really tall stack of black drawers (plus you may notice that the top five drawers are empty right now!) and then a stack of white ones for paper. (I know in the old pictures, there were no white drawers. Those were older pictures, so the white drawers were actually already in the craft room prior to the makeover. They were in two stacks under the desk though. They were originally purchased to use as workboxes for the kids.)
(Here are the black drawers that I use. I bought them all quite a long time ago, and only when they were on sale. The white drawers are these ones or must be very similar. I must have stumbled upon an older type, as I got them on clearance.)
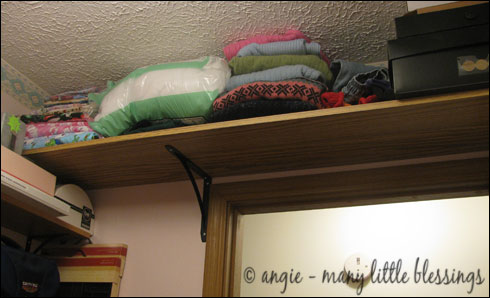
Though we didn’t do anything different with the above the door shelf, other than getting rid of almost everything that used to be stored up there, I wanted to show it as an idea for storage. I love the above the door shelf for things that I don’t need to get often. It is a great use of space that is often open and not used.
This is my new chair. I am so thrilled to not be using a folding chair to do crafting! We shopped at Staples for the chair, and I was shocked at how expensive they were. After Eric tried to convince me to spend $230 on a chair, I pretty much was going to suggest we leave. However, then I ran into this chair. (Not literally.) Although it did end up being our single biggest expenditure for this project, it was on sale, so I was happy for that. We paid $40 (and it is really comfy!), and it was originally $90.
I hope that some of our uses of space give you some ideas for how you can use the space that you have! We don’t have a very big house, so we’ve tried to find as many ways as possible to use what space we have. I like to think of the craft room as an example of Eric’s ingenuity.
Tomorrow, we’ll look at how I’m storing materials. And then on Thursday, it’s going to be your turn to share some sprucing up you’ve done in your house this week! (Don’t get overwhelmed and think it has to be something huge — it doesn’t. But, also keep in mind that from planning until finish on this project, it was less than 48 hours!)
Be sure to check out all of the great ideas from some of my favorite bloggers for sprucing up around your house this week (and be ready, because on Thursday, we’ll have a link up so you can post about your own Spruce Up project):
Sprucing Up the Laundry Room | Mama’s Laundry Talk
Sprucing Up the School Room | Homegrown Mom
Sprucing Up the Craft Room | Many Little Blessings
Sprucing Up the Bathroom | Feels Like Home
Sprucing Up the Playroom | …Life’s About a Dream
Sprucing Up the Garage/Storage Space | A Slob Comes Clean
Sprucing Up the Master Bedroom | Raising Arrows
Sprucing Up Your Homeschool | Jimmie’s Collage
Sprucing Up the Kitchen | So Happy Together
Sprucing Up the Garden | An Oregon Cottage
Sprucing Up the Backyard | Successful Homeschooling
This post is linked to Works for Me Wednesday and Frugal Friday.
Join 40,000+ Other Awesome People
Subscribe to the Real Life at Home weekly newsletter to get our latest content, exclusive free printables, learning activities, and ideas for celebrating with your kids all year



Looks great! I can picture you making your etsy things in there 🙂
Angie, it looks great! How great that you have such a handy husband.
What a marvelous transformation. Love the look of the shelves on same wall as your desk. And I love the open wall spaces where you have been able to hang things.
Wow, your room looks amazing and you will enjoy it so much more now! Fun, fun for you!
Aren’t handy husbands great? 🙂 It looks so good.
Amen to that! I’m very thankful for him!
Everything looks great!
That desk is awesome- so large and roomy. What a great idea to use a wood shelf- more $ for your comfy chair. Love it. 🙂
There is something so sexy about a man with a cordless drill in his hand! I am married to one of those guys and he is so awesome. Thanks for sharing your makeover and I hope you bloom with creativity within its’ space.
Looks great! I thought about doing something similar for my craft room, which is in my closet right now. yours looks nice and organized.
xo,
Sena
Oh Angie – that is SUPER impressive! Isn’t it so nice to have a handy husband?! So grateful for mine.
You’ve worked hard! Go rest 🙂
-Lauren
I took your advice and slept for about three hours straight as a nap yesterday right on the couch. LOL The whole family just went about their business around me. (Apparently I was pretty tired.)
I am so jealous! I would love to have a craft room, but my hopes for one went away when my husband begged to have the garage for a “man cave”. Well, at least he won’t complain about the craft supplies all over the house anymore. LOL
How great! Nothing better than an office/workspace re-organization. Just makes you want to jump right in and be creative. I love it! 🙂
In 2024 I am letting you know I’m doing this now with little space. I hope mine looks as nice as both of you made this look. Amazingly affordable, functional work. Thanks for sharing. I can’t wait to start on mine with your incentive.
I love that all this work happened while you were sleeping. That’s the best kind of project!
And how! I love it when projects involve me sleeping through them. 😉
Angie, I love your ideas, especially the shelf/desk. I am going to use your idea and have a long work space also (I can’t wait). Can you tell me how you have the desk/shelf anchor to the wall? You said your husband sat on it. My husband loves to overdo and is insisting that we put legs for added support. I would prefer the open space. Maybe if I can give him an idea on how to anchor it, I can at least talk him into fewer legs!
Jeannette –
He attached the desk/shelf to the wall with brackets, just like you can see he did with all of the shelves that are actually being used as shelves. He just used ones that were more heavy duty. I know that one pair, for sure, was rated to hold 1,000 pounds (between the two of them). I think he used those and then maybe some smaller brackets as well. Good luck!
I’m planning on doing this super soon. What kind of store did you get the shelf from?
Amanda – I would just check one of the big home improvement/DIY types of stores, like Lowe’s or Home Depot. Good luck!
How did you keep your bottom drawers from collapsing? I stacked on two units and the bottom drawers started collapsing and I couldn’t open them. I love the idea of stacking several!
Are they the exact same drawers, Tammy? I haven’t had any trouble with anything like that. With the ones that I have, I don’t even know how that could happen. I was about to say maybe if it was really heavy, but I have it stacked really high (as you can see) and still can open the bottom drawer just fine. Sorry you’re running into that issue!
Thank you for sharing your craft room makeover with us. I have one room in the mobile home we are refurbishing that will be my craft space and also a spare room if we have someone come stay with us. I love the shelf workspace and will probably try to incorporate that into my space as well. I’ve saved your blog on my favorites so I can come back when we are ready to begin the work in that room. You know, a picture is worth a thousand words 🙂
You’ll have to check back in after you get it all set up. 🙂